Room monitoring and controlling system with ESP32, BME280, and Web Server
In THIS ARTICLE, I will show you how I developed a system based on the ESP32 microcontroller and its web server properties to measure room temperature and use the results to control the activation of a fan (which will be modeled by an LED), while also installing a manual control from the browser. This project is part of a course in embedded systems guided by the excellent Dr. Kusprasapta Mutijarsa, S.T, M.T. of the Bandung Institute of Technology (ITB).
Prerequisite
- ESP32 microcontroller
- Jumper wire cables (MM)
- 3mm or 5mm LEDs
- 330 Ω resistors
- BME-280 barometric sensor
I also used the BMP-280 sensor at first, although it is ultimately unnecessary.
To-do list
I planned out my actions as followed:
- Assemble the circuit
- Prepare and install the barometric sensor
- Create a connected web page
- Create a manual button and an automated system
Installing BMP-280
You might notice that I first used BMP-280 this time, not the more advanced BME-280 that I previously used. This is because the item was lost during… to be honest, I don’t know. We can learn from this experience that we must take care of our components, or else they might be carelessly put in a trashcan or some other more senseless scenario.
In any case, to use BMP-280, I first installed the Adafruit BMP-280 library in Tools → Manage Libraries.


I then created this contraption, using the following pins:
- GPIO21 ← → SDA (white cable)
- GPIO22 ← → SCL (blue cable)
- The appropriate pins for GND and power
These are the default pins for any I2C-interfaced devices, meaning that I don’t have to make any changes to the Wire settings. I also assigned an LED circuit, although it will only be used for later purposes.
Now, I ran a sanity test to see whether the barometric sensor is working, using this program.
#include <Wire.h>
#include <SPI.h>
#include <Adafruit_BMP280.h>#define BMP_SCK  (13)
#define BMP_MISO (12)
#define BMP_MOSI (11)
#define BMP_CS   (10)Adafruit_BMP280 bmp; // I2C
//Adafruit_BMP280 bmp(BMP_CS); // hardware SPI
//Adafruit_BMP280 bmp(BMP_CS, BMP_MOSI, BMP_MISO,  BMP_SCK);void setup() {
  Serial.begin(9600);
  Serial.println(F("BMP280 test"));if (!bmp.begin()) {
    Serial.println(F("Could not find a valid BMP280 sensor, check wiring!"));
    while (1);
  }/* Default settings from datasheet. */
  bmp.setSampling(Adafruit_BMP280::MODE_NORMAL,     /* Operating Mode. */
                  Adafruit_BMP280::SAMPLING_X2,     /* Temp. oversampling */
                  Adafruit_BMP280::SAMPLING_X16,    /* Pressure oversampling */
                  Adafruit_BMP280::FILTER_X16,      /* Filtering. */
                  Adafruit_BMP280::STANDBY_MS_500); /* Standby time. */
}void loop() {
    Serial.print(F("Temperature = "));
    Serial.print(bmp.readTemperature());
    Serial.println(" *C");Serial.print(F("Pressure = "));
    Serial.print(bmp.readPressure());
    Serial.println(" Pa");Serial.print(F("Approx altitude = "));
    Serial.print(bmp.readAltitude(1013.25)); /* Adjusted to local forecast! */
    Serial.println(" m");Serial.println();
    delay(2000);
}
However, there was a problem: this error appears.
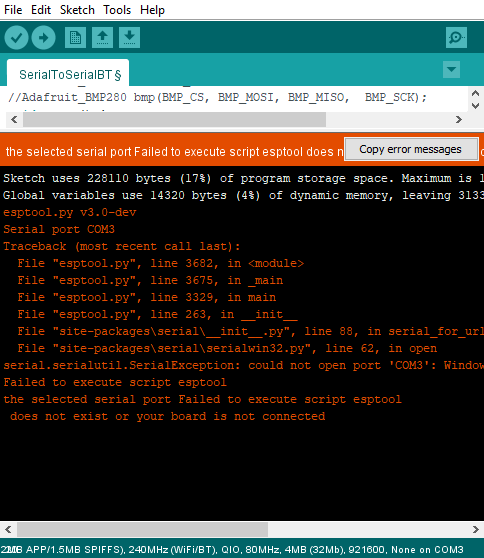
Upon debugging, this error is more serious than it originally appears. First, when I try to run a sanity test using the Blink example, the same error appears!
Following the suggestion on the error message, I promptly reconnect the cables and retry the Blink program. It worked. However, when I ran the program, nothing appears on the Serial monitor, even though both sides are set at the same speed of 9600 baud.
So, is it a problem with the I2C connection? BMP-280 uses the 0x76 address as a default, but just to be sure, I ran this program to check on it. If the I2C interface is indeed broken, there should be a pre-programmed error message appears. Instead, it functions normally.

But here’s the kicker: when I tried to run the BMP-280 base program again, the original fatal error reappeared. And it also reappeared on the Blink test program.
As such, it can be concluded that something very wrong happened when the program successfully detects the I2C connection.
Installing the BME-280
Like a terrible joke, as the problems became deadlocked, I found my lost and more advanced BME-280. I have worked with that sensor before; you can find it here: https://zhillan-arf.medium.com/using-bme280-to-display-temperature-humidity-and-pressure-with-esp32-91333957c9e. In any case, I promptly ditched my problematic sensor, set up the same GPIO and I2C connections, and run the following sanity test.
#include <Wire.h>
#include <Adafruit_Sensor.h>
#include <Adafruit_BME280.h>

/*#include <SPI.h>
#define BME_SCK 18
#define BME_MISO 19
#define BME_MOSI 23
#define BME_CS 5*/

#define SEALEVELPRESSURE_HPA (1013.25)

Adafruit_BME280 bme; // I2C
//Adafruit_BME280 bme(BME_CS); // hardware SPI
//Adafruit_BME280 bme(BME_CS, BME_MOSI, BME_MISO, BME_SCK); // software SPI

unsigned long delayTime;

void setup() {
  Serial.begin(9600);
  Serial.println(F("BME280 test"));

  bool status;

  // default settings
  // (you can also pass in a Wire library object like &Wire2)
  status = bme.begin(0x76);
  if (!status) {
    Serial.println("Could not find a valid BME280 sensor, check wiring!");
    while (1);
  }

  Serial.println("-- Default Test --");
  delayTime = 1000;

  Serial.println();
}


void loop() {
  printValues();
  delay(delayTime);
}

void printValues() {
  Serial.print("Temperature = ");
  Serial.print(bme.readTemperature());
  Serial.println(" *C");

  // Convert temperature to Fahrenheit
  /*Serial.print("Temperature = ");
  Serial.print(1.8 * bme.readTemperature() + 32);
  Serial.println(" *F");*/

  Serial.print("Pressure = ");
  Serial.print(bme.readPressure() / 100.0F);
  Serial.println(" hPa");

  Serial.print("Approx. Altitude = ");
  Serial.print(bme.readAltitude(SEALEVELPRESSURE_HPA));
  Serial.println(" m");

  Serial.print("Humidity = ");
  Serial.print(bme.readHumidity());
  Serial.println(" %");

  Serial.println();
}
It… didn’t work. Actually, it resulted in the exact same pattern of error.
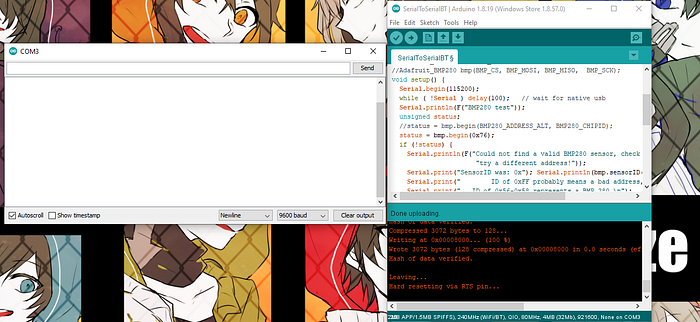
Dumbfounded, I tried the oldest trick in the book: rebooting my IDE. It worked.

I actually experimented and retried the BMP-280, but it failed to detect the device. Well, whatever; I now have a working sensor to measure temperature.
Creating a connected web server
I used this HTML code to create a page to display the measurements of the sensor.
<!DOCTYPE html>
<html>
<head>
<meta name="viewport" content="width=device-width, initial-scale=1">
<link rel="icon" href="data:,">
<style>
body {
text-align: center;
font-family: "Trebuchet MS", Arial;
}
table {
border-collapse: collapse;
width:35%;
margin-left:auto;
margin-right:auto;
}
th {
padding: 12px;
background-color: #0043af;
color: white;
}
tr {
border: 1px solid #ddd;
padding: 12px;
}
tr:hover {
background-color: #bcbcbc;
}
td {
border: none; padding: 12px;
}
.sensor {
color:white;
font-weight: bold;
background-color: #bcbcbc;
padding: 1px;
}
</style>
</head>
<body>
<h1>ESP32 with BME280</h1>
<table>
<tr>
<th>MEASUREMENT</th>
<th>VALUE</th>
</tr>
<tr>
<td>Temp. Celsius</td>
<td><span class="sensor">--- *C</span></td></tr>
<tr>
<td>Temp. Fahrenheit</td>
<td><span class="sensor">--- *F</span></td>
</tr>
<tr>
<td>Pressure</td>
<td><span class="sensor">--- hPa</span></td>
</tr>
<tr>
<td>Approx. Altitude</td>
<td><span class="sensor">--- m</span></td>
</tr>
<tr>
<td>Humidity</td>
<td><span class="sensor">--- %</span></td>
</tr>
</body>
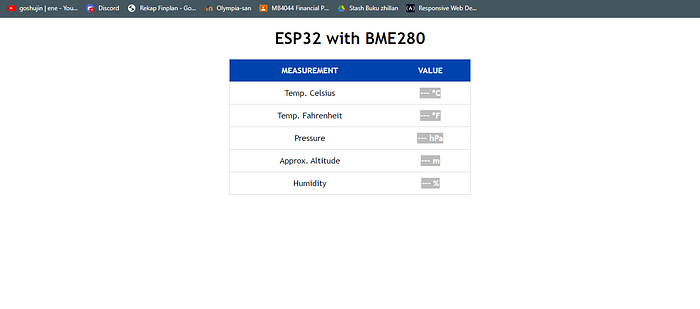
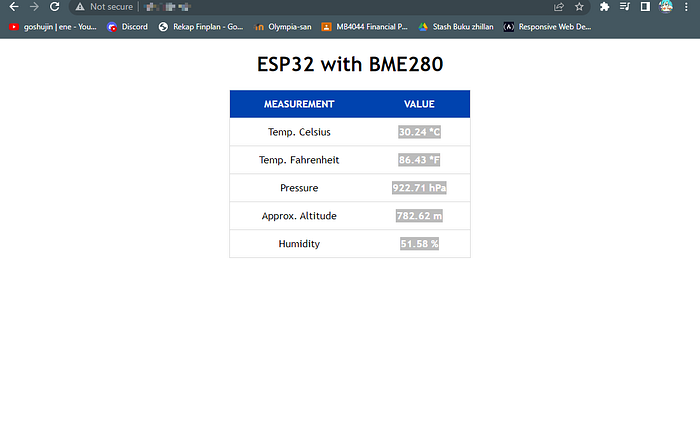
</html>The page itself looked like this.
Of course, I still need to add a manual button, which I will add later. Now, to send this HTML code from the server (ESP32 microcontroller) to the client (my laptop), I used the client.println command. All in all, I inputted the looped readings from sensor to the code, and created this program.
/*********
  Rui Santos
  Complete project details at http://randomnerdtutorials.com
*********/

// Load Wi-Fi library
#include <WiFi.h>
#include <Wire.h>
#include <Adafruit_BME280.h>
#include <Adafruit_Sensor.h>

//uncomment the following lines if you're using SPI
/*#include <SPI.h>
#define BME_SCK 18
#define BME_MISO 19
#define BME_MOSI 23
#define BME_CS 5*/

#define SEALEVELPRESSURE_HPA (1013.25)

Adafruit_BME280 bme; // I2C
//Adafruit_BME280 bme(BME_CS); // hardware SPI
//Adafruit_BME280 bme(BME_CS, BME_MOSI, BME_MISO, BME_SCK); // software SPI

// Replace with your network credentials
const char* ssid     = "REPLACE_WITH_YOUR_SSID";
const char* password = "REPLACE_WITH_YOUR_PASSWORD";

// Set web server port number to 80
WiFiServer server(80);

// Variable to store the HTTP request
String header;

// Current time
unsigned long currentTime = millis();
// Previous time
unsigned long previousTime = 0;
// Define timeout time in milliseconds (example: 2000ms = 2s)
const long timeoutTime = 2000;

void setup() {
  Serial.begin(115200);
  bool status;

  // default settings
  // (you can also pass in a Wire library object like &Wire2)
  //status = bme.begin();
  if (!bme.begin(0x76)) {
    Serial.println("Could not find a valid BME280 sensor, check wiring!");
    while (1);
  }

  // Connect to Wi-Fi network with SSID and password
  Serial.print("Connecting to ");
  Serial.println(ssid);
  WiFi.begin(ssid, password);
  while (WiFi.status() != WL_CONNECTED) {
    delay(500);
    Serial.print(".");
  }
  // Print local IP address and start web server
  Serial.println("");
  Serial.println("WiFi connected.");
  Serial.println("IP address: ");
  Serial.println(WiFi.localIP());
  server.begin();
}

void loop(){
  WiFiClient client = server.available();   // Listen for incoming clients

  if (client) {                             // If a new client connects,
    currentTime = millis();
    previousTime = currentTime;
    Serial.println("New Client.");          // print a message out in the serial port
    String currentLine = "";                // make a String to hold incoming data from the client
    while (client.connected() && currentTime - previousTime <= timeoutTime) {  // loop while the client's connected
      currentTime = millis();
      if (client.available()) {             // if there's bytes to read from the client,
        char c = client.read();             // read a byte, then
        Serial.write(c);                    // print it out the serial monitor
        header += c;
        if (c == '\n') {                    // if the byte is a newline character
          // if the current line is blank, you got two newline characters in a row.
          // that's the end of the client HTTP request, so send a response:
          if (currentLine.length() == 0) {
            // HTTP headers always start with a response code (e.g. HTTP/1.1 200 OK)
            // and a content-type so the client knows what's coming, then a blank line:
            client.println("HTTP/1.1 200 OK");
            client.println("Content-type:text/html");
            client.println("Connection: close");
            client.println();

            // Display the HTML web page
            client.println("<!DOCTYPE html><html>");
            client.println("<head><meta name=\"viewport\" content=\"width=device-width, initial-scale=1\">");
            client.println("<link rel=\"icon\" href=\"data:,\">");
            // CSS to style the table
            client.println("<style>body { text-align: center; font-family: \"Trebuchet MS\", Arial;}");
            client.println("table { border-collapse: collapse; width:35%; margin-left:auto; margin-right:auto; }");
            client.println("th { padding: 12px; background-color: #0043af; color: white; }");
            client.println("tr { border: 1px solid #ddd; padding: 12px; }");
            client.println("tr:hover { background-color: #bcbcbc; }");
            client.println("td { border: none; padding: 12px; }");
            client.println(".sensor { color:white; font-weight: bold; background-color: #bcbcbc; padding: 1px; }");

            // Web Page Heading
            client.println("</style></head><body><h1>ESP32 with BME280</h1>");
            client.println("<table><tr><th>MEASUREMENT</th><th>VALUE</th></tr>");
            client.println("<tr><td>Temp. Celsius</td><td><span class=\"sensor\">");
            client.println(bme.readTemperature());
            client.println(" *C</span></td></tr>");
            client.println("<tr><td>Temp. Fahrenheit</td><td><span class=\"sensor\">");
            client.println(1.8 * bme.readTemperature() + 32);
            client.println(" *F</span></td></tr>");
            client.println("<tr><td>Pressure</td><td><span class=\"sensor\">");
            client.println(bme.readPressure() / 100.0F);
            client.println(" hPa</span></td></tr>");
            client.println("<tr><td>Approx. Altitude</td><td><span class=\"sensor\">");
            client.println(bme.readAltitude(SEALEVELPRESSURE_HPA));
            client.println(" m</span></td></tr>");
            client.println("<tr><td>Humidity</td><td><span class=\"sensor\">");
            client.println(bme.readHumidity());
            client.println(" %</span></td></tr>");
            client.println("</body></html>");

            // The HTTP response ends with another blank line
            client.println();
            // Break out of the while loop
            break;
          } else { // if you got a newline, then clear currentLine
            currentLine = "";
          }
        } else if (c != '\r') {  // if you got anything else but a carriage return character,
          currentLine += c;      // add it to the end of the currentLine
        }
      }
    }
    // Clear the header variable
    header = "";
    // Close the connection
    client.stop();
    Serial.println("Client disconnected.");
    Serial.println("");
  }
}
To create a server-client connection using my local Wifi connection, I need to search for its SSID and password. I thus need to replace these with the appropriate data.
...
// Replace with your network credentials
const char* ssid     = "REPLACE_WITH_YOUR_SSID";
const char* password = "REPLACE_WITH_YOUR_PASSWORD";
...
The SSID is found in the Wifi properties.
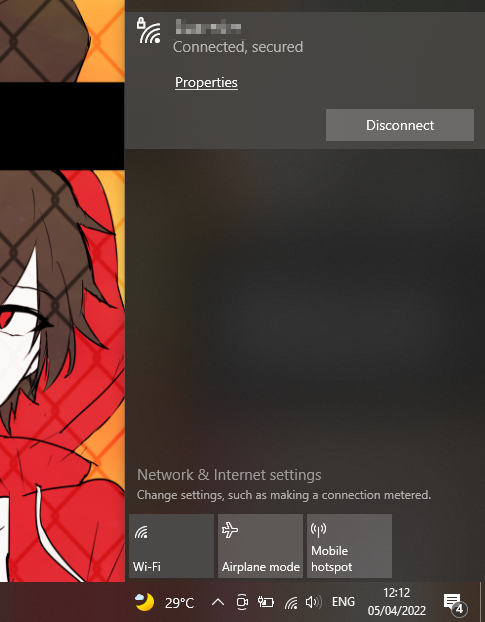
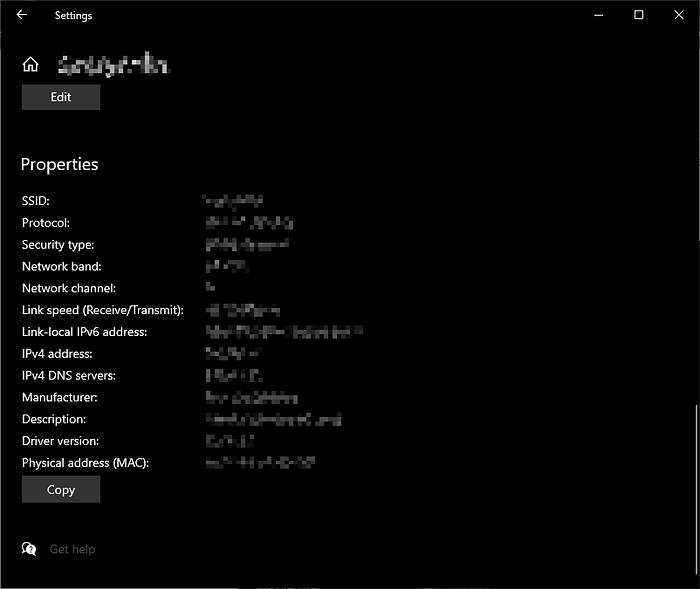
The SSID and the Wifi name is thus one and the same. Unsurprisingly, the password is my Wifi password. I inputted the data and run the code. Then, I pressed the “EN” button in my ESP32 to get the information about the server.
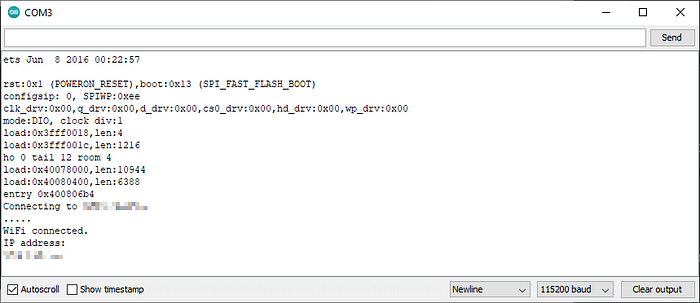
I copied the IP address of the server to my browser and voila! Here is the result. It displayed the measurements quite nicely.
Creating the automated — manual LED system
The original task is to actually model an automated fan system based on the temperature, with a manual on/off button. I added the button, along with its CSS styling and its I/O system for the manual input, resulting this program.
// Load Wi-Fi library
#include <WiFi.h>
#include <Wire.h>
#include <Adafruit_BME280.h>
#include <Adafruit_Sensor.h>//uncomment the following lines if you're using SPI
/*#include <SPI.h>
#define BME_SCK 18
#define BME_MISO 19
#define BME_MOSI 23
#define BME_CS 5*/#define SEALEVELPRESSURE_HPA (1013.25)Adafruit_BME280 bme; // I2C
//Adafruit_BME280 bme(BME_CS); // hardware SPI
//Adafruit_BME280 bme(BME_CS, BME_MOSI, BME_MISO, BME_SCK); // software SPI// Replace with your network credentials
const char* ssid     = "Grezyarifin";
const char* password = "01072001";// Set web server port number to 80
WiFiServer server(80);// Variable to store the HTTP request
String header;
// Auxiliar variables to store the current output state
String outputState = "off";
// Assign output variables to GPIO pins
const int output = 23;
// Current time
unsigned long currentTime = millis();
// Previous time
unsigned long previousTime = 0;
// Define timeout time in milliseconds (example: 2000ms = 2s)
const long timeoutTime = 2000;void setup() {
  Serial.begin(115200);
  bool status;// default settings
  // (you can also pass in a Wire library object like &Wire2)
  //status = bme.begin();
  if (!bme.begin(0x76)) {
    Serial.println("Could not find a valid BME280 sensor, check wiring!");
    while (1);
  }// Initialize the output variables as outputs
  pinMode(output, OUTPUT);
  // Set outputs to LOW
  digitalWrite(output, LOW);// Connect to Wi-Fi network with SSID and password
  Serial.print("Connecting to ");
  Serial.println(ssid);
  WiFi.begin(ssid, password);
  while (WiFi.status() != WL_CONNECTED) {
    delay(500);
    Serial.print(".");
  }
  // Print local IP address and start web server
  Serial.println("");
  Serial.println("WiFi connected.");
  Serial.println("IP address: ");
  Serial.println(WiFi.localIP());
  server.begin();
}void loop(){
  WiFiClient client = server.available();   // Listen for incoming clientsif (client) {                             // If a new client connects,
    currentTime = millis();
    previousTime = currentTime;
    Serial.println("New Client.");          // print a message out in the serial port
    String currentLine = "";                // make a String to hold incoming data from the client
    while (client.connected() && currentTime - previousTime <= timeoutTime) {  // loop while the client's connected
      currentTime = millis();
      if (client.available()) {             // if there's bytes to read from the client,
        char c = client.read();             // read a byte, then
        Serial.write(c);                    // print it out the serial monitor
        header += c;
        if (c == '\n') {                    // if the byte is a newline character
          // if the current line is blank, you got two newline characters in a row.
          // that's the end of the client HTTP request, so send a response:
          if (currentLine.length() == 0) {
            // HTTP headers always start with a response code (e.g. HTTP/1.1 200 OK)
            // and a content-type so the client knows what's coming, then a blank line:
            client.println("HTTP/1.1 200 OK");
            client.println("Content-type:text/html");
            client.println("Connection: close");
            client.println();// turns the GPIOs on and off
            if (header.indexOf("GET /23/on") >= 0) {
              Serial.println("LED on");
              outputState = "on";
              digitalWrite(output, HIGH);
            } else if (header.indexOf("GET /23/off") >= 0) {
              Serial.println("LED off");
              outputState = "off";
              digitalWrite(output, LOW);
            }

            // Display the HTML web page
            client.println("<!DOCTYPE html><html>");
            client.println("<head><meta name=\"viewport\" content=\"width=device-width, initial-scale=1\">");
            client.println("<link rel=\"icon\" href=\"data:,\">");
            // CSS to style the table
            client.println("<style>body { text-align: center; font-family: \"Trebuchet MS\", Arial;}");
            client.println("table { border-collapse: collapse; width:35%; margin-left:auto; margin-right:auto; }");
            client.println("th { padding: 12px; background-color: #0043af; color: white; }");
            client.println("tr { border: 1px solid #ddd; padding: 12px; }");
            client.println("tr:hover { background-color: #bcbcbc; }");
            client.println("td { border: none; padding: 12px; }");
            client.println(".sensor { color:white; font-weight: bold; background-color: #bcbcbc; padding: 1px; }");// CSS to style the on/off buttons
            client.println("<style>html { font-family: Sans-serif; display: inline-block; margin: 0px auto; text-align: center;}");
            client.println(".button { background-color: #0043af; border: none; color: white; padding: 16px 40px;");
            client.println("text-decoration: none; font-size: 30px; margin: 2px; cursor: pointer;}");
            client.println(".button2 {background-color: #ff0000;}</style></head>");

            // Web Page Heading
            client.println("</style></head><body><h1>ESP32 with BME280</h1>");
            client.println("<table><tr><th>MEASUREMENT</th><th>VALUE</th></tr>");
            client.println("<tr><td>Temp. Celsius</td><td><span class=\"sensor\">");
            client.println(bme.readTemperature());
            client.println(" *C</span></td></tr>");
            client.println("<tr><td>Temp. Fahrenheit</td><td><span class=\"sensor\">");
            client.println(1.8 * bme.readTemperature() + 32);
            client.println(" *F</span></td></tr>");
            client.println("<tr><td>Pressure</td><td><span class=\"sensor\">");
            client.println(bme.readPressure() / 100.0F);
            client.println(" hPa</span></td></tr>");
            client.println("<tr><td>Approx. Altitude</td><td><span class=\"sensor\">");
            client.println(bme.readAltitude(SEALEVELPRESSURE_HPA));
            client.println(" m</span></td></tr>");
            client.println("<tr><td>Humidity</td><td><span class=\"sensor\">");
            client.println(bme.readHumidity());
            client.println(" %</span></td></tr>");
            client.println("</body></html>");// Display current state, and ON/OFF buttons for GPIO 23
            client.println("<p>Fan State " + outputState + "</p>");
            if (outputState=="off") {
              client.println("<p><a href=\"/23/on\"><button class=\"button\">ON</button></a></p>");
            } else {
              client.println("<p><a href=\"/23/off\"><button class=\"button button2\">OFF</button></a></p>");
            }
            client.println("</body></html>");

            // The HTTP response ends with another blank line
            client.println();
            // Break out of the while loop
            break;
          } else { // if you got a newline, then clear currentLine
            currentLine = "";
          }
        } else if (c != '\r') {  // if you got anything else but a carriage return character,
          currentLine += c;      // add it to the end of the currentLine
        }
      }
    }
    // Clear the header variable
    header = "";
    // Close the connection
    client.stop();
    Serial.println("Client disconnected.");
    Serial.println("");
  }
}
Here is the result!
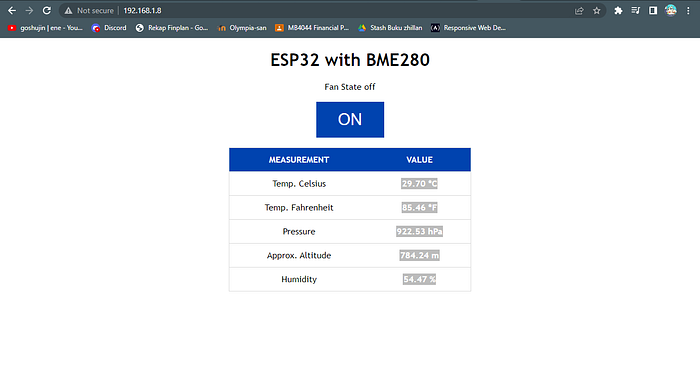
I then tried out the manual system, and it works! Obviously, though, it is quite hard to test out the temperature as I have to put the system in a hot place.

Well, that is all from me, and the last self-project. Next week, I’ll work on the finals: a project about an automated fish tank cleaning system.